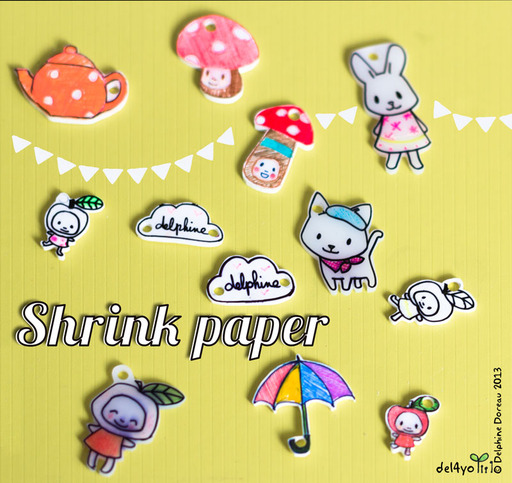
Shrink paper how to
Getting it right with shrink paper is not that easy!
I had this idea in mind of cute shrink paper jewelry. Getting the process just right for wearable art was much more work than expected. I am actually still testing products and ideas.
I tested 3 kinds of paper from Grafix. The printable one would never flatten back after curling in the oven : maybe I got a lemon, but it's too expensive to make more tests. The translucent one did well but the result is not to my taste . The white one was exactly what I wanted but was very difficult to glaze or varnish.
I drew with classic Sharpies on the white grafix shrink paper, but Sharpie ink is NOT permanent on shrink paper. It looks ok. But after a while it melts on the skin or rubs off. It's difficult to glaze because it is soluble with alcohol, acetone, and water. Most varnish have that kind of solvent.
So I enquired around, with friend from many horizons, the stylists, the artists, the educators, the art store sales persons and the movie makers!
I ended up with a few solutions.
1.I you want a beautiful finish with an illustration like feel:
First sand your white shrink paper with a 400 grit sand paper to give it some tooth. There will be dust. Don't do this near any computer or electronic device.
Draw with colored pencils ( Prismacolor work beautifully). Keep in mind that your drawing will shrink to 40% of its size or more so your colors will be 2.5 more concentrated, at minimum. Browns will be black, reds will be intense, etc. Cut out, don't forget to punch holes. Shrink according to instructions.Then glaze or varnish with either Sculpey gloss for a shiny result or some artist acrylic medium ( the paste kind sold in tubes) for a more matte finish.
I first sketched my drawings on paper then put the paper over it to copy. It's thin enough before shrinking that you can see through .
2.If you want a black outline and maybe some fun neon accents.
Don't use classic Sharpies, especially the black ones. If you still do, the only glazes I found that worked were white glue (it won't dry properly) and artist acrylic medium. Thing is, the acrylic medium doesn't dry pretty like a glaze and I find it frustrating. It's not a professional result. I tried to glaze over medium with Sculpey gloss but it's not perfect.
I tried oil paint based Sharpies with sanded paper. Not a good idea. The ink feathered. Yuck!
I tried the same oil markers on un-sanded paper, it worked! I added a few classic Sharpie neon accents because I noted they were doing better with glaze ( better, not perfect). I was afraid, since it's oil based, that it wouldn't cook very well, but it did OK. I can't vouch for fumes though. Maybe it's toxic, but with the very little amount of ink I used I thought it might be ok. The oil based Sharpie is not melting with glaze or acrylic medium, and if not glazed doesn't rub off as fast as the classic sharpie.
So : Draw on unsanded shrink paper with oil paint based Sharpies , cut out , don't forget to punch holes, shrink according to instructions, glaze or not ( it might rub off if you don't. It might dilute if you do).
So in conclusion
There is only two combos that I really liked:
1.Sanded paper, Prismacolor, acrylic medium ( you can try some matte finish too) : it gives a nice "out of the book" illustration look.
It's the one on the teapot.
2.Oil based sharpie permanent marker, sculpey glaze. It gives a fun shiny ceramic look.
it's the one on the cloud
That's it! I tried dozens of tools and finishes and had a lot of fail. But the good results are really pretty.
Please use my tutorial but not my illustrations if you want to sell and make your own jewelry. Make your own tests before giving or selling as I can't vouch for constant results.


